A tour on Python Packaging
Posted on Thu 08 November 2018 in packaging
If you're new to Python or a mature one and want to share your code with other developers or you have build a library to be used by end users and you're struggle with the packaging, then this tutorial/post/explanatory guide is (possibly) for you.
Prerequisites
First of all, you must understand some basics around Python packaging terminology or else this (useful) post will turn into an incomprehensible one!
Your first stop is packaging glossary. In there, you'll find the terminology around python packaging. Some things I would like to highlight:
artifact(not listed): fancy word for filesource distribution (sdist): simple, source only.tar.gzarchive. Only for pure Python modules/packages (ones that do not contain any C/C++ code).- The institution set up to deal with distribution in Python is called the Python Packaging Authority.
So, to a programmer, a
distributionlooks like a directory containing a bunch of Python code next to asetup.pywhich describes that code and adds some metadata to it like the name, version, author etc.
Assumptions
This post assumes that python 3.6 is used and you're comfortable with virtualenvs:
- Python 3.6 is used
- virtualenv is used
- and more preferably virtualenvwrapper is used
If neither virtualenv or virtualenvwrapper are used then, the built-in
python3 -m venv path/to/virtualenv command may be used as well but you have
to take care (each time) of the activate script and that pip, setuptools and
wheel are installed (things that the above tools do automatically).
When the status of the PEP 582 - Python local packages directory becomes Final then we (might) get rid of the 3rd party virtualenv tools.
Packaging in Python
It has been written and it's quite self-explanatory. Nothing to add here.
As a general-purpose programming language, Python is designed to be used in many ways. You can build web sites or industrial robots or a game for your friends to play, and much more, all using the same core technology.
The term python packaging is quite broad and depending on the scenario and purpose of the code written, it applies accordingly. That said, in this post we will focus on packaging Python source distributions. This means to package a Python package (for distribution) that contains pure Python code.
Modularity
PyPI
The PyPI is the one and only deposit area/space where all Python packages are stored (just like npmjs where all Javascript packages are stored). Of course, you may have a locally Python package which you don't plan to upload to PyPI. That's OK. But if you want to share your code with others, then PyPI is the answer.
Imagine this deposit area like a warehouse (fun fact: that's the alternate name for PyPI). The main objective of a warehouse is the storage of goods. Each good is stored inside a container (a box). This container takes its place somewhere inside the warehouse. Probably, stacked with other goodies.
setuptools
setuptools is a Python library (just like hundreds of thousands ones)
which purpose is to take your Python package (directory) as input
and convert it to an archive in order to be placed in the PyPI index.
It's the recommended tool by the PyPA.
setuptoolsis the tool to wrap your good inside a container and, eventually,
this container be placed inside the warehouse. The insertion into the warehouse is not performed
by setuptools, but by another Python package called twine.
wheel
wheel is a Python library which provides a bdist_wheel command for setuptools.
A wheel file (file.whl) is a ZIP-format archive with a specially formatted filename and
the .whl extension.
A wheel archive may be considered as a container with specifications (like specific
dimensions, weight, labels etc). All wheels will have the same format and, thus, can be
easily unpacked and introspected. Skip the rest and read about wheels.
twine
twine is a Python library which given an OS path to your previously converted
archive files (i.e path/to/packaged/archive), it uploads them on the PyPI.
It's the recommended package by the PyPA to publish Python packages on PyPI in a secure manner
(that is over https).
Consider twine as the machine that takes your well-wrapped package and inserts it,
with extreme caution, into the warehouse. Now, your package is stored safely amongst other packages!
pip
pip is another Python library that acts as a package manager.
It's main role is to download/install/update/downgrade/uninstall packages from/to your system.
When you pip install something then what pip does is this: it goes to the PyPI index
(unless told to go somewhere else - even look in local directories
and fetches and install the requested package.
In the warehouse analogy, pip is the machine (make it a forklift, if you like)
that enters the warehouse, picks the appropriate container, unpacks it and delivers it to you
(the position of you is outside of the warehouse, waiting for your package to come!).
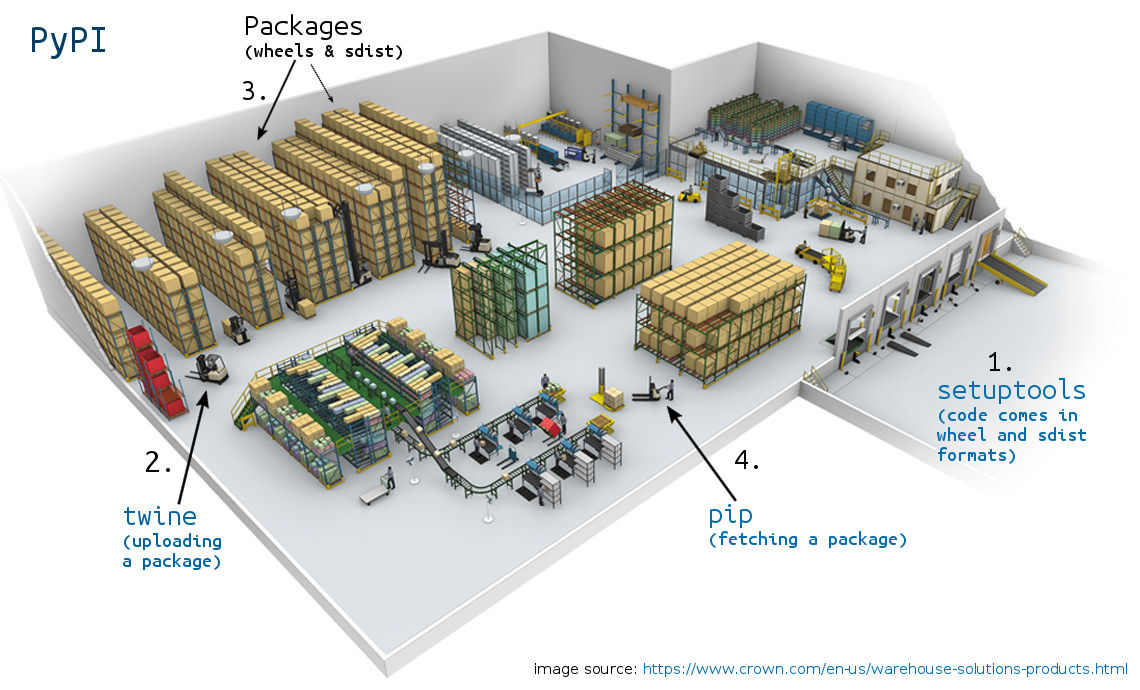
So, there you have it, a warehouse (PyPI) to store Python codes (libraries, #3),
a tool to wrap your code (setuptools, #1) in specific formats (sdist and wheel, #3),
a tool to put Python code into the warehouse (twine, #2) and a tool to fetch and
install Python code from the warehouse into your machine (pip, #4).
This is the backbone knowledge in order to proceed into more on Python packaging.
Once these concepts are clear to your head, then you have everything you need in your arsenal
to package a Python package with ease, reliability and security.
Also, others will be able to download your package and install it without any issues.
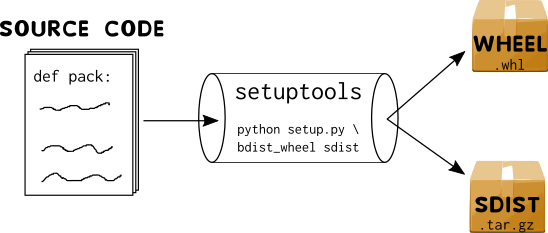
Difference between sdist and bdist_wheel
PyPUG (Python Package User Guide) has already covered this difference but I would like to clarify some things.
The command to convert your local directory (which is meant to be a Python library)
into a distributable one is python setup.py sdist bdist_wheel.
This command will read your setup.py along with other ones (MANIFEST.in, setup.cfg etc)
and will generate two archives: a .tar.gz (sdist aka source distribution) and a .whl
(bdist_wheel aka binary distribution wheel or just wheel) one.
You may inspect both of them by double-click on each.
The main difference between the two is that:
- The
sdistarchive contains a single directory which consists of your source files (your actual code which may be either a Python module or a Python package) along with thesetup.py,setup.cfg,MANIFEST.inetc files (and optionally along with yourtests/,docs/directories depending on yourMANIFEST.infile). - The
wheelcontains only two directories, the directory that holds your source files only (without thesetup.pyfiles etc) and a.dist-infodirectory which contains metadata of your package. If you like to learn more on this extra directory, read the PEP 427 -- The Wheel Binary Package Format 1.0 and the upcoming PEP 491 -- The Wheel Binary Package Format 1.9 which is still indraftstatus.
Another difference is that installing from wheel is as simple as copy-paste the two
directories as-is inside the site-packages directory of your environment (that's it)
while installing from sdist requires this extra step of reading the setup.py do any
potential compilation, convert to wheel and then add the directories inside the site-packages dir.
I am not saying it's bad to install from source but since the author of a package is able to
produce a wheel as well, then why not upload that too?
Besides, since pip prefers wheel, having both kind of distributions uploaded,
allows one to convert sidst to wheel, store it (cache it) and next time it will
use the cached one (saving bandwidth).
The other way around, convert wheel into sdist is not feasible. Put it that way,
wheel is a distribution format much more minimal that sdist, thus there is no way
for wheels to generate sdists.
If your question is why to have both generated and uploaded to PyPI, the answer is
the edge case of some users which do not have the wheel package installed
or have an old version of pip which does not support installation from wheel packages.
On the other hand, having only source distributions uploaded (sdist) you enforce users
to compile your package each time they download it.
This may not sound too time-consuming but if your package consists of Python extensions
(i.e C, C++ etc) then compiling those may take a long time comparing with wheel.
So, upload both and keep everybody happy!
The basics
By now, you either have a clear image about what is happening or you're completely lost, regarding, of course, Python packaging. In this chapter we will play with an imaginable Python package and try to distribute it to other Pythonistas.
Name
The first thing you'll want to consider when your aim is to create a redistributable Python package (either to use is locally or distribute it via PyPI) is the name of it. Once the package has been created and begins to grow, if you decide to change the name of the package in the middle of the road, then it'll be hard to spot and change references to this name across your project. Think first, act last. Of course, IDEs will help you do that in an easy manner, but that means that you had made a frivolous choice.
Nevertheless, assuming that you're going to build something that is related with flowers
you'll have to go to PyPI and search for this term. If it's occupied then see if you
can attach a hyphen (-) and add another word into it. Do not name your package with more than two
words and make it possible so others will simply pip install package and then in their code do
import package or from package import func.
Sometimes, of course, this will not be feasible, but please try! It's clean, elegant and lazy (for the others).
Older methods that required to register the name of the package before uploading it, are gone. You, now, proceed directly to uploading artifacts.
We have decided that we would like to build a Python library which will add some more
capabilities (methods) for Python strings and lists.
An idea taken from lodash (a famous JS library extending built-in capabilities).
The name of it would be booster. I think it's concise, short and right to the point.
Plus, it's not reserved in PyPI (until this post is written)
nor it would be since we'll not upload it. Maybe, a nice choice/idea for the next developer!
Cookiecutter
We will make our life easier and rely on a cookiecutter to build our package rather than build it from scratch. That's the reason of a cookiecutter. To make your/our lives as developers easier.
There is one dominant cookiecutter for Python packages: the cookiecutter-pypackage and several other popular forks like Nekroze, ardydedase, samastur and thousands more! Pardon me if I have missed a multi-starred cookiecutter. If so, let me know in the comments below and I'll update this section.
The logic behind a cookiecutter is pretty simple. A project structure has already been written by the author leaving
placeholders (usually with {{ name }}) to be filled through CLI questions by the developer.
Thus, you pip install cookiecutter into your virtualenv (or pip install --user cookiecutter to install it under the ~/.local/ directory)
and now you have the cookiecutter command available. Note that cookiecutter is a CLI command, not a project template. You use this command
along with a project template URL in order to create a project. Thus, you run cookiecutter <github_repo_url>,
a series of questions is initiated and at the end you'll have a pre-configured Python package ready to be
developed (not deployed, since there is no source code written by you, yet).
For more info, read the installation guide for the cookiecutter of your choice.
There is a ton of templates to choose from (from pure Python packages
to Django, Flask, Pyramid, C++, Java, JS, Tornado etc).
In this post, we'll use audreyr's cookiecutter template for pure Python packages.
Structure
Using the above cookiecutter, the following questions showed up...:
(distvenv) nick ~/t/boo> cookiecutter https://github.com/audreyr/cookiecutter-pypackage.git
full_name [Audrey Roy Greenfeld]: Nick Mavrakis
email [audreyr@example.com]: web@web.gr
github_username [audreyr]: manikos
project_name [Python Boilerplate]: booster
project_slug [booster]: booster
project_short_description [Python Boilerplate ... a Python package]: Extra functionality for Python strings!
pypi_username [test_user]: test_user
version [0.1.0]:
use_pytest [n]: y
use_pypi_deployment_with_travis [y]: y
add_pyup_badge [n]: n
Select command_line_interface:
1 - Click
2 - No command-line interface
Choose from 1, 2 [1]: 1
create_author_file [y]: y
Select open_source_license:
1 - MIT license
2 - BSD license
3 - ISC license
4 - Apache Software License 2.0
5 - GNU General Public License v3
6 - Not open source
Choose from 1, 2, 3, 4, 5, 6 [1]: 1
(distvenv) nick ~/t/boo>
...creating the following project structure:
(distvenv) nick ~/t/boo>ls
booster

(distvenv) nick ~/t/boo>tree booster/
booster
├── AUTHORS.rst
├── booster
│   ├── booster.py
│   ├── cli.py
│   └── __init__.py
├── CONTRIBUTING.rst
├── docs
│   ├── authors.rst
│   ├── conf.py
│   ├── contributing.rst
│   ├── history.rst
│   ├── index.rst
│   ├── installation.rst
│   ├── make.bat
│   ├── Makefile
│   ├── readme.rst
│   └── usage.rst
├── HISTORY.rst
├── LICENSE
├── Makefile
├── MANIFEST.in
├── README.rst
├── requirements_dev.txt
├── setup.cfg
├── setup.py
├── tests
│   └── test_booster.py
└── tox.ini

3 directories, 25 files
Depending on your given answers to the questions the structure may be different, but some files not, since they are mandatory in order to call this directory a re-distributable Python package.
You may have seen in other Python libraries that the source code is inside a directory called src/.
I will not advice you to put your code inside the src/ directory or not.
There is an open issue on PyPA user guide on github
and if you're brave enough, go read it. After all, it's a great discussion exchanging different thoughts.
That's the spirit of a healthy community!
There is also a great post that enforces you to use the src/ dir.
Decision is yours. Whichever you take, make sure that your package, at the end, is installable and usable without any errors.
Now back to the above, generated, file structure. Do not freak out seeing all these files! Most of them are there to support your project.
You may ask if all these are mandatory in order to upload your simple Python package.
No, they are not. If you had, only, the booster dir (containing booster.py file which is actually your code)
and the setup.py file you would be good to go. A single dir and a file. But that would not be too helpful because it lacks:
- license
- documentation
- tests
- continuous integration (CI)
- version control
and other goodies which make your package more mature and complete.
Be patient. Do not rush yourself. Spend some time and write documentation
and tests. Many other developers (including yourself tomorrow) will thank you. Personally, if I see a package with no docs, I skip it.
Short story. Not because it's not useful or I want to penaltize it, but because I don't know how to install and use it.
What do I import? What arguments a function takes? How about tests? Is it tested thoroughly? Why do I have to read the source code in order to use it?
All these questions are vital to every developer before using a package (not just a Python one).
How satisfied/confident are you when you see a package with decent documentation and over 80% test coverage? Someone, wrote all these. Someone that took the writing of his/her Python package, seriously. Maybe it's not a single person but a group of contributors. It does not matter. Time has been spent in order to write docs and tests. That's what makes a package beautiful and elegant.
Lesson learned: Do not hurry to finish your package. PyPI is not going away. Be fussy not only for coding but to support it as well (support means docs and tests).
requirements_dev.txt
You may have noticed the file requirements_dev.txt which contains the requirements (aka dependencies) of your project in case
another developer (or even you, the author) wants to reproduce it. By pip installing the package, these requirements
will not be honored. These are just for development cases. The official docs say:
Whereas
install_requiresdefines the dependencies for a single project, Requirements Files are often used to define the requirements for a complete Python environment.
We have not seen install_requires yet, but keep the above statement in mind. Also, note that this file may be named
any name you like. It's just a convention to name it that way.
Suppose, for example, that you and me are working on the booster package. We, both, must have the same development environment
which means the same versions of dependencies and, of course, the same Python version. requirements_dev.txt ensures scenarios
like this and if I change (or format) my computer then I will be able to reproduce this environment by pip install -r requirements_dev.txt
under my virtualenv and will be back to tracks.
You may, also, want to switch requirements_dev.txt with Pipfile (and its auto-generated brother Pipfile.lock).
No changes here. The same logic applies. Instead of pip install -r requirements_dev.txt you would do pipenv install.
Makefile
This is a usual Make file which provides some useful
CLI commands to facilitate your development flow.
It's a cookiecutter-specific file and you may alter it at your own needs. Other cookiecutters may have similar Make file.
You can view it, in order to see each function details or just write make (under the root package directory,
booster in our case) and have an overview of the available commands.
LICENSE
The official packaging docs cover this file but I would like to add to it a little more.
This is a mandatory file that must not be empty. If it's omitted then the default LICENCE applied to the
project/package is all rights reserved which basically means I, the owner of the package, am the only one allowed
to use this package. Thus, why bother uploading to PyPI? Just keep it in your local directory. PyPI means sharing and
adding a non-empty LICENSE file, respects this.
There is a myriad type of licenses out there and digging into them brings a lot of confusion, resulting in omitting the file, altogether. Play safe and adopt the MIT or BSD licence. I am not promoting these kind of licenses but it's the most commonly used for open source projects. The user's limitation, by using a package under one of the above licenses, is to keep the name and the copyright declaration intact. A useful website that might be help you to pick a license is the choosealicense.com.
Congratulations, you now have a package ready to be shared!
docs/, AUTHORS.rst, CONTRIBUTING.rst, HISTORY.rst and README.rst
As you might have guessed, these files are documentation files. Each file is pre-filled with content (thank you cookiecutter) and the tweaks you might do, the first time, are minor. Each file is quite self-explanatory. Open each file to read the contents and alter it if you like.
These files are written using the reStructuredText file format.
You may use the Markdown format but be aware that .rst files are by far more rich and extensible.
They play perfect together with Sphinx. Learning this kind of language may take some time but the benefits you gain are huge.
Did we mention to not rush yourself to finish your beloved Python package?
If you do change the format, however, you must use a special keyword
inside the setup function, the long_description_content_type=text/markdown.
We have not seen this function, yet. I am keeping the desert for last :)
Fun fact: The reStructuredText file format may be applied to any kind of text. Not just documentation for you code. After all, documentation is just text (code-agnostic). You could write a novel too.
Another part of the documentation procedure is Sphinx. Sphinx is a documentation generator. What this means is that
you write a bunch of .rst files, you run make html and voila. The HTML look of your ugly-looking files have been
generated. A PDF version is also available. There is list of HTML templates available to choose and also Sphinx can
be customized through the docs/conf.py file. The cookiecutter tool, also, provides another Makefile, exclusive for
doc facilitation. I think there is no reason, now, not to write docs.
Bonus tip #1: Once docs have been written, you may upload them on readthedocs.org (RTD for short). Just link your github repo to the RTD and you're good to go (you need an account before that).
Bonus tip #2: If your Python package is small enough and writing a bunch of docs would be considered overkill
because there is not much to say about it (that is, it can all fit in a single file) then it is perfectly fine
to include just a README file. You may then upload it to readthedocs.org. Remember that if
you use Markdown, you should change the long_description_content_type value inside the setup() function.
Beware though, that the skeleton of this file stays the same with the full version of the documentation,
which is a contributing, a history (or changelog), an installation, a usage section etc.
tests/ and tox.ini
Code without tests is unreliable. Simple as that. It's like having a "friend" on facebook without actually ever interact with this person. In what context is this person your friend? Friends, in a general meaning, are people we can count on them. They are reliable. So are the tests of your code. No more to add here.
Whether you use pytest, unittest, nose or something else, all your
test files should live inside the test/ directory.
In addition, tox is a Python library which helps you to test your code under different
Python versions and contexts in general. It's extremely powerful, quick and easy to use (although,
there is a slight learning curve, at start, in order to understand how to write the tox.ini file).
setup.py
After the description of all the aside helper files and folders (excluding the booster sub-directory which is actually your
source code), created by the cookiecutter, we are now ready to dive in to the beast called setup.py.
I will not go through the evolution of Python packaging because Nick Coghlan has already posted about it. A lot have changed and there is more to come.
Briefly, this file is just a regular Python file which, at top, contains a very important import statement:
from setuptools import setup
The setup function is the beast we mentioned above. It serves two roles:
- Describes the package (name, author, requirements, scripts etc)
- It's the tool you run to convert a package (full of source code) into an installable & distributable unit.
Using the electronic engineering terminology, you may say that this component is both active and passive, depending on how you use it. More on this in a little bit.
After the import statement, a simple call to the setup function is all you need. An example, using
our booster package is shown below.
from setuptools import setup, find_packages


with open("README.rst") as readme_file:
    readme = readme_file.read()

with open("HISTORY.rst") as history_file:
    history = history_file.read()

setup(
    # Project information
    name="booster",
    version="0.1.0",
    author="Nick Mavrakis",
    author_email="nick@nick.gr",
    url="https://github.com/manikos/booster/",  # 404, just an example
    license="MIT license",

    # Description
    description="Extra functionality for Python strings.",
    long_description=f"{readme}\n\n{history}",
    long_description_content_type='text/x-rst',

    # Requirements
    python_requires='>=3.6',
    install_requires=[],
    extras_require={
        'test': [  # install these with: pip install booster[test]
            "pytest>=3.8",
            "coverage>=4.5",
            "pytest-cov>=2.6",
            "tox>=3.3",
            "codecov>=2.0",
        ],
    },

    # Packaging
    packages=find_packages(include=["booster", "booster.*"]),
    include_package_data=True,
    zip_safe=False,

    # Tests
    test_suite="tests",

    # CLI
    entry_points={
        "console_scripts": ["transform=booster.cli:string_transform"]
    },

    # Metadata
    keywords="string strings accent beautify",
    project_urls={
        'Documentation': 'https://booster.readthedocs.io/en/latest/',
        'Tracker': 'https://github.com/manikos/booster/issues/',
    },
    classifiers=[
        "Development Status :: 5 - Production/Stable",
        "Intended Audience :: Developers",
        "Topic :: Software Development :: Build Tools",
        "License :: OSI Approved :: MIT License",
        "Natural Language :: English",
        "Programming Language :: Python :: 3 :: Only",
        "Programming Language :: Python :: 3",
        "Programming Language :: Python :: 3.6",
        "Programming Language :: Python :: 3.7",
    ],
)
Again, do not freak out. This is the present state of packaging in Python and believe it or not
it's better than ever. Also, if you think that this setup.py file is confusing, have a look
at other Python libraries and then you may freak out!
The setup function is called using keyword arguments (not positional ones). The whole list of these parameters
can be found in the setuptools docs.
Recalling the first role of setup.py file above, calling this function, allows us to describe the package metadata, dependencies etc.
Recalling the second role of setup.py file above, executing (through the shell) python setup.py <command> allows us to
do things (build artifacts, wheels etc) with the package. The artifacts that may be generated using the CLI command,
contain (as text in specific dirs/files) the metadata, dependencies etc written inside the setup function. So, these two
roles are, somehow, interconnected.
You may now visit PyPI and pick a package which has both formats available for download (in the Downloads section, on the left).
Download both archives (.whl and .tar.gz). Open the .whl and inspect the .dist-info/ dir.
Open, also, the setup.py file inside the .tar.gz and see the call to the setup() function.
You will find all the setup() keyword-value items inside the .dist-info/METADATA file.
I hope, by now, the two roles of setup.py are now distinguished and understood.
When you run python setup.py sdist in order to create a source distribution (we will talk about that)
and your setup() is empty, then the script will run with no errors but your source distribution will be named UNKNOWN
and you will get some nice warnings:
warning: check: missing required meta-data: name, url
warning: check: missing meta-data: either (author and author_email) or (maintainer and maintainer_email) must be supplied
which are quite self-explanatory: at least pass the name, url, author and author_email as arguments to setup function.
But, please, do not supply only these! This is just for demonstration purposes. You should be explicit about your package.
Now, lets take a deep breath and dive in to the setup basics.
Metadata
This section is named Metadata but it's a kind of grouping, of setup function, in my head. No official docs call it
this way. Because, setup contains a lot of keyword arguments I want to organize them into logical groups. Thus,
I give it the name of Metadata to distinguish it from the other keywords. After all, it's the easy part.
In this section, setup(**kwargs), the - pretty straightforward - keyword arguments contain the:
name: name of the package (what other users willpip install)author: your name (after all you're the author)author_email: a contact email of yoursurl: project's URL (usually a VCS url)license: a string declaring the license title (the full body is written in theLICENSEfile)description: a string containing a short/brief description of the packagelong_description: a string with more details (usually the same as theREADMEfile)long_description_content_type: one of'text/plain','text/x-rst'(default) or'text/markdown'keywords: just a list of strings (not used anywhere practically for the moment)project_urls: dictionary oftitle: urlkey-value pairs.classifiers: a list of predefined strings to be used for filtering/searching when searching via the PyPI website
Again, all of the above might be too much, but the cookiecutter has already pre-filled most of them for us with sane defaults (actually the defaults are the answers you gave through the console). You may edit them, add new ones, delete some etc. These were, more or less, the easy-to-understand ones.
Requirements
install_requires
We discussed earlier about environment reproduction using requirements_dev.txt or Pipfile or any other tool
you might use to resolve dependencies. But how about the dependencies of the project itself?
These are declared through the install_requires keyword argument. It's a list of strings and contains all
the 3rd party libraries (if any) your project/library depends on. If your library depends on foo Python
library, then inside the install_requires list, the 'foo' string must be included, otherwise when the end-user
will pip install <library_name> then the foo library will not be installed resulting in an error when running
you package.
Remember, the requirements_dev.txt is used for pip install -r requirements_dev.txt only (for development
purposes), while install_requires is used only during the installation of the library (pip install <library_name>).
You are allowed not to have a requirements_dev.txt file at all. Also, if your project does not depend on other
libraries, the install_requires may be omitted as well. But, if your project is dependent on other libraries
you must have the install_requires inside the setup function.
The best practice when you list dependencies is not to pin them (i.e library==x.y) to a specific version.
Just specify the minimum major version and you're to go (i.e "library>=x.y"). The reason for this practice
may be found here.
python_requires
The python_requires argument
specifies to the installer tool (pip, poetry etc) under which Python
version this package may run. If, for example, you're working in a virtualenv with Python 3.6 interpreter and you want
to install a package named foo which has declared python_requires==2.7, then pip will exit with an error message:
(py_36_venv) $ pip install foo  # foo is Python 2.7 compatible only
Could not find a version that satisfies the requirement foo (from versions: )
No matching distribution found for foo
You should fill this one since it prevents early running errors regarding Python versions.
extras_require
This is a handy way of installing additional packages by simply enabling flags. Based on the above setup,
if I want to download this package and install test-related packages only, then I would run pip install booster[test],
where test (the name inside the brackets) is a key of the dictionary. This key maps to a list of dependencies and thus
by executing this command the test-related packages will be installed. You may have a ton of other aside packages
grouped together under a single name (all these under this dictionary), i.e "security": [...].
A reminder though, do not confuse this requirement setting with the install_requires one.
The former is (usually) for other developers while the latter is for the end user which will simply do pip install booster.
Entry points
This is a handy feature of setuptools which allows us to define CLI commands which when executed, certain
Python functions will run.
For example suppose that inside the booster/cli.py file, we have written the following:
# booster/cli.py

def string_transform():
    print('string transformed!')
and, recalling the setup function above:
from setuptools import setup

setup(
    entry_points={
        "console_scripts": ["transform=booster.cli:string_transform"]
    },
)
Now, once the package has been installed, opening a console we can simply write
transform and the message string transformed! will get printed on screen.
What is happening, behind the scenes, is that setuptools create an executable file
inside the bin/ directory of the virtualenv dir (just like pip, wheel and other commands that
are available through the command line) which maps to the function(s) declared in the value of the
key console_scripts, under the entry_points dictionary.
The string is composed of "<cli_command_name>=<python_dottted_path_to_module>:<function_name>".
Of course, the above function instead of printing something it can return something, accept parameters
(transform <a string here> <another one>) etc. If you plan to have cli support then Click
is a must-have library to do this kind of things.
Packaging
This will be the most hard-to-explain section, but I will do my best. You know, there are several things in life where while you're trying to explain a single thing, another thing needs to be explained first and then you realise that another thing needs to be explained first etc and at the end you forget what you were trying to explain at the first place! Same rule applies here but I'll try to be consistent and not get lost.
First of all, before talking about packaging, we must understand the available forms of packaging. Referring to the image at the beginning, Python packages come in two forms: wheels and source distributions (#3 on image). It can also be seen from the image below:
Wheels (aka built distribution)
The wheel binary package format or built distribution or just wheel is a way to package code into a redistributable way. The abstract of it's PEP, is quite comprehensive:
A wheel is a ZIP-format archive with a specially formatted file name and the
.whlextension. It contains a single distribution nearly as it would be installed according to PEP 376 with a particular installation scheme. Although a specialized installer is recommended, a wheel file may be installed by simply unpacking into site-packages with the standard 'unzip' tool while preserving enough information to spread its contents out onto their final paths at any later time.
In other words, instead of having a source distribution file that pip downloads, unpacks and runs "setup.py install", the wheel format has things, effectively, in the format that they need to be when they are installed on the system. So pip can just unpack the zip file (.whl) in a very specific way, but you don't actually have to run any code to do installs. This means that installs are much faster and safer since you don't execute arbitrary code from the internet.
Wheels come in three flavors:
universal, pure Python and platform. Because of its compiled extensions (C extensions), Numpy comes in platform wheels.
Take a minute and choose the appropriate distribution wheel. Simple rule of thumb: Does your package contains pure
Python code? If yes, choose either pure Python (does not support both Python 2 and 3) or universal (your package
does support both Python 2 and 3). If no, then you must go with platform wheel. No worries, though. The command
is the same in all options: python setup.py bdist_wheel. The onle point of difference is inside the setup.cfg file.
We will get to that.
Furthermore, wheel formats have another advantage. Their filename says a lot about the package. Have a minute and visit the
numpy downloadble file list. There is a whole list of different wheels
(the source distribution is at the bottom). Luckily, you don't have to choose one, download and install. pip
will do it for you automatically, depending on your OS system, Python version etc. My point here is that the author
of the package has the ability to make the package installable on different platforms, Python versions etc, using
the wheel format. No chance with the source dist one.
Visiting PyPI and examining some packages, you may see that not all packages have a wheel format. However, all of them have a source distribution one. A good practice is to always generate both wheel and source distributions each time you upload a new version of your package.
Now that we have explained what a wheel is, theoretically, lets build one for our booster package.
The command that builds a wheel is python setup.py bdist_wheel. If you like, run python setup.py bdist_wheel --help
to get a list of options applied to this command (most popular is --universal).
If you get an error running this command, then your working Python environment has not the wheel
library installed (which is installed automatically every time you create a virtualenv using the virtualenv library).
You can see that using setup.py this way, it acts as the 2nd role we described earlier (tool for handling packages etc).
Note that no code has been written yet inside the booster/booster.py file.
It doesnt matter because at this point we're focusing on the package rather the contents of each file.
$ cd path/to/booster/
$ python setup.py bdist_wheel
running bdist_wheel
running build
...
If you examine the root booster directory, you will see that three new directories have been created:
booster.egg-info/, build/ and dist/. Leave the first two folders intact and focus on the dist one.
This would be the directory (although it's name may be changed, -d option) where you'll place your wheels
and your source distributions as well. These two go together. Always. Remember that. wheel + sdist = BFF
like we wrote in the 90's.
The contents of the .whl file are two folders: booster/ and booster-0.1.0.dist-info/. If you paste
the booster/ folder into your virtualenv site-packages folder, then booster would be available in your
Python path (i.e you can do import booster).
-
Aside fact #1: there is another way to build a wheel for your package (although, the above method should always be used). Once inside the root directory of the package run
pip wheel -w dist --no-deps .(this will create only adist/dir which includes the.whlfile). -
Aside fact #2: We have mentioned the wheel library but we have not used it yet. In fact you never have to play with it but you may install wheels through this library also. Again, this is not the recommended way. Once you have a wheel of your library, you may install it with
wheel install dist/booster-0.1.0-py2.py3-none-any.whl. Verify that by doing:pip freeze | grep booster. There it is! Butwheelcommand has no uninstall procedure which signifies that this method is unsuitable for installing/uninstalling packages. To uninstall it runpip uninstall booster. Pressy(for yes) and it's gone. -
Aside fact #3: Since
pipcan install wheels, let's take a look of a manual way of doing that. Again, this is not the recommended way. Inside the root package runpip install --no-index --find-links=. dist/booster-0.1.0-py2.py3-none-any.whl. Because the default behavior ofpipis to look for package in the PyPI index we tell it to not look at any (--no-index) and advise it to look for packages in the current dir (--find-links=.). Next follows the path of the wheel file. This works brilliantly but it's overkill to write all these every time! -
Aside fact #4: Enter developer mode. Or else
editablemode. When you develop your package, instead ofpip installit every time you make a change (or you want to examine aprintstatement somewhere) you may symlink it and then all changes will be applied automatically. You can either dopython setup.py develop(which shows a verbose output) orpip install -e .(where the dot at the end specifies the current working directory which is the project root one) which gives a suppressed output but pay close attention at it. It saysRunning setup.py develop for booster. So, the same command is used. Anyhow, I prefer to use the latter (pip install -e .) and I'm good to go. -
Aside fact #5: You may notice that wheels include only what's under your source code directory. Anything else outside will not be included (because, simply, it's not needed in order for your library to run). So, if your
MANIFEST.infile (we'll look at it below) includes other dirs/files outside thebooster/root source directory, runningpython setup.py bdist_wheel, the produced.whlarchive will not include those. However, it will include any dirs/files (written in the manifest) that are inside thebooster/root source dir. On the other hand, all the above are not valid for thesdistdistribution. In this format, almost everything are included in the.tar.gzarchive. -
Aside fact #6: You may produce a wheel artifact out from an
sdist, but not the other way around. -
Aside fact #7: You might have heard of Python
.eggfiles. These kind of archives are considered obsolete. The official packaging docs state that wheels are now considered the standard. So, there is no need to worry about them. Considerwheelthe upgraded version ofegg.
Sdist (aka source distribution)
Source distribution (sdist for short) is actually a .tar.gz file which contains not only the directory
where your code lives but also the other files (depending of the contents of MANIFEST.in file)
inside the root directory of the package (such as setup.py, setup.cfg etc).
Some packages on PyPI either have only sdists, wheels or both. pip will always prefer a wheel
because it's faster and requires no compilation at all. In contrast, if wheel file is missing,
pip will download the sdist, run python setup.py install and finally install the lib. Sdist
has all the information needed to build a wheel, install the library etc. That's why it's called
source distribution.
To build a sdist simply python setup.py sdist. Note that this command will not create a build/ dir
like bdist_wheel did earlier. It creates a booster.egg-info/ and a dist/ folder. Inside the dist/
folder you can see the .tar.gz archive which contains your package with all the accompanying dirs and
files.
Of course, running python setup.py sdist --help will show you the available options for the sdist argument.
There are other formats you can archive your package. python setup.py sdist --help-formats to see the list.
Usually, we do not run python setup.py bdist_wheel and python setup.py sdist individually. We combine
these commands into a single one python setup.py bdist_wheel sdist (bdist_wheel comes first in case you forget ;)
and any options on each argument (if any) are included in the setup.cfg file. What? How setup.py file gets the
options from the setup.cfg file? We will look at it in a moment when we will talk about setup.cfg.
In order to facilitate this process, the Makefile (created by the cookiecutter) has a command called dist which
first deletes the build/ dir, the dist/ dir, any hidden .eggs/ dir, any .pyc files and other stuff and finally
runs python setup.py bdist_wheel sdist in order to generate the new distribution pair of artifacts. Run it as
make dist.
Reminder: Until now, we have talked about how to wrap your package into a format that can be uploaded to PyPI and
be distributed to the Python world. We have not talked about how to upload a package to PyPI or once uploaded
how to install it in your machine. We have talked about the number 3 referring to the image on top. Although,
we have used pip (#4) and setuptools (#1).
Packages
The packages keyword argument to setup() function tells setuptools where to look to find Python code.
It takes a list of strings declaring Python package names. We could, in our example, not used the
find_packages function at all and instead write setup(packages=["booster"]) or use the find_packages
without any parameters, setup(packages=find_packages()). It would be exactly the same.
This argument (packages), however, is important because if you got it wrong then your actual code will not be included inside
the distributable package (both the wheel and the sdist)!
The handy function find_packages is given some parameters and it looks for Python modules.
setuptools docs for find_packages function
explain it very well:
Anyway,
find_packages()walks the target directory, filtering by inclusion patterns and finds Python packages (any directory). Packages are only recognized if they include an__init__.pyfile. Finally, exclusion patterns are applied to remove matching packages.
In our case, we have a single dir called booster/ and under it three Python modules
(booster.py, cli.py and __init__.py). The find_packages function is called without any arguments resulting
in including this dir into the distributable one. If, however, this dir was not a Python package (without the
__init__.py module) then it will not be included by this function.
Fire up a Python console and import find_packages from setuptools:
from setuptools import find_packages

find_packages()
# ['booster']
Now, delete the booster/__init__.py and run find_packages again:
from setuptools import find_packages

find_packages()
# []
It doesnt matter how many subpackages your main package have. The find_packages function
will work recursively and find them all. However, if you have, say, a file named config.json
or config.yml or anything that does not have a .py suffix and you want to include it, because
somewhere you parse it and use it, then find_packages will not help you there.
These kind of files are not Python ones and thus they are called data files. There are many scenarios on including those files and once again setuptools docs for data files have all these covered in an explicit fashion.
zip_safe
To be really honest I don't quite comprehend this setting and to always play safe I set it on False.
As per the PEAK docs say about setuptools:
For maximum performance, Python packages are best installed as zip files. Not all packages, however, are capable of running in compressed form, because they may expect to be able to access either source code or data files as normal operating system files. So, setuptools can install your project as a zipfile or a directory and its default choice is determined by the project's zip_safe flag.
Also a post on medium
tries to explain zip_safe option. Last but not least read this
answer on StackOverflow about zip_safe.
As I understand it, unless you know what you're doing keep zip_safe=False. Most Python packages (small and big ones) have it False.
test_suite
This option, once again is covered by the setuptools docs.
When set, then you'll be able to run python setup.py test and the test suite will get initiated.
In our example, the test_suite keyword is set to the tests/ directory. That's it. Try to run python setup.py test and
see the already written by the cookiecutter test run and succeed. Since we are using pytest we can also run tests using
pytest or py.test or python setup.py pytest.
If you get the error E ModuleNotFoundError: No module named 'booster' then you have not installed booster in your virtualenv.
Do that first (pip install -e .) and then rerun pytest.
setup.cfg
This file is not mandatory but most of the times comes in handy due to repetition of setup.py command options.
It's an ini file and describes how the setup.py is going to run. Instead of doing python setup.py bdist_wheel --universal,
you set this option inside the setup.cfg as follows:
# apply to the "setup.py bdist_wheel" command
# the universal option with a value of 1 (that is, set it to true)
[bdist_wheel]
universal=1

[aliases]
test=pytest
A general practice is to list the available setup.py commands with python setup.py --help-commands
and for each command, list it's available options, i.e python setup.py --help sdist. Then, if
you want an option to persist while you create sdist formats, you write it down to setup.cfg along
with it's corresponding value.
However, this is not true for the alias command. Although, the command is python setup.py alias <alias_name> <alias_command>
the corresponding entry in the setup.cfg is [aliases]. Delete this section and save setup.cfg.
Then run python setup.py alias test pytest. This will write to the setup.cfg the lines that you previously deleted.
The [aliases] was added.
There are other Python libraries, such as bump2version (a library to manage your package's version) that
are compatible with setup.cfg and allow you to define their command options inside this file. Then, whenever
you run bumpversion minor the file setup.cfg will be read under the hood for any options defined.
Another technique that gains popularity is to make the setup.cfg fat and keep setup.py thin. What is meant
by this is to put all the metadata inside the setup.cfg so that the setup.py will, eventually, consist of
the following:
from setuptools import setup

setup()
It can't be any simpler! It's a matter of choice. I prefer to keep my balances and have them both in a sane size.
Nevertheless, it's a good idea to have setup.cfg in place, in order not to forget certain options, since this file provides
defaults for the setup.py script (in other words it describes how the setup.py script behaves).
A good read on this is the official python docs on distributing python modules (legacy version)
MANIFEST.in
This file defines everything else that needs to be included in your source distribution (not the wheel)
that isn't actually necessary for the code to run itself. In contrast to setup.py file which defines
the code that's going to be executed, which code do I need to include, the requirements of the
project etc (where all these are for functional purposes), MANIFEST.in file describes other
files/dirs you need to include in your source distribution (such as docs, tests, images, html files, examples etc).
As mentioned earlier, data files (anything other than .py files) are not included by default
in your distributable package. To do so you must use the include_package_data=True keyword argument
of the setup() function and the script will read the MANIFEST.in file and include all dirs/files
listed into the sdist one (and to the wheel if they are under the source root directory).
So, the keyword arguments of setup(): include_package_data, package_data and exclude_package_data work together
with the MANIFEST.in file in a combination fashion in order to determine what other files are to be included in the sdist
package format. In fact, any files that match exclude_package_data patterns will be included in the sdist format but
when the package gets installed on the system (pip install package) they will be excluded from the installation.
You may read more on the MANIFEST.in file on the official Python docs about MANIFEST.in.
If you find yourself lost with this kind of file (as I did in the beginning), check-manifest
is very good tool that kind of syncs version controlled dirs/files with the sdist one.
It also recommends which files should be added to the MANIFEST.in file.
Upload
Once you have your Python package wrapped in a distributable form (remember, both wheel and sdist) then it's
time to share it. Your distributable ones, conventionally, live under the dist/ dir, in the same level as
setup.py is. The place where all Python packages are stored is called PyPI.
Since, an image worth a thousand words, here you are:

The way to upload your goodies on PyPI is called twine. However, in order to be absolutely sure that your package can be installed and run correctly without errors, the testing PyPI server exists to host (temporarily) packages and expose such errors (uploading, installation etc).
So, before you upload you package to the official live PyPI server (the default one), test it first and then upload it officially. You'll need two different accounts; one for the testing and one for the default one.
Both uploads use the same command and it's pretty straightforward:
# for the testing PyPI server
twine upload --repository-url https://test.pypi.org/legacy/ dist/*

# for the default PyPI server
twine upload dist/*
After each new version release of your package, it's a good idea to empty the dist/ directory
from previous ones. Also delete the build/ dir as well. As already been said above, the cookiecutter
has a command to help you with this, make dist.
Important note #1: PyPI does not allow to upload an artifact with the same version. That is, if your uploaded
package version is 0.1.0 and you discovered a minor bug (say a typo to a string, a minor one) and fix it
without change the version and try to upload it again, PyPI will complain with the following error:
Uploading booster-0.1.0-py2.py3-none-any.whl
100%|███████████████████████████████████████████████████████████████████████████████████| 8.94k/8.94k [00:01<00:00, 5.84kB/s]
HTTPError: 400 Client Error: File already exists. See https://test.pypi.org/help/#file-name-reuse for url: https://test.pypi.org/legacy/
Fix that by increment the patch version part to 0.1.1 and then upload it. Or wait for some feedback
from the users, gather some bugs and then update it. It depends on the scenario and how big these
bugs are.
Important note #2: Every time you change a version you should log it inside the HISTORY.rst
or the CHANGELOG.rst file (if you have it). That's a good practice not only for documentation
tracking purposes but also for the end users who need to know what has changed since the previous
version.
keyring
After running the above command(s), twine will ask your username and password. Instead of providing them
through the console each time, there is another way, the lazy one.
Under your virtualenv install keyring (once again, you're using a virtualenv, don't you?),
pip install keyring. Read the installation docs carefully because at some platforms, additional platform-specific
libraries might be needed. As it's docs say:
keyringprovides an easy way to access the system keyring service from Python. It can be used in any application that needs safe password storage.
Before, keyring, the recommended practice was to create a .pypirc file
under your home directory and inside there write in plain text the username and password for
each index (test and default).
Those days are gone and we may now be much more safe and cryptic.
Back to keyring, run the following two commands (one at a time):
keyring set https://test.pypi.org/legacy/ <your_testing_PyPI_username_here>
keyring set https://upload.pypi.org/legacy/ <your_default_PyPI_username_here>
Each command will prompt you for your password. Enter it and you're good to go.
Installing your uploaded package
Once the package has been uploaded to the testing server, you may install it from there, in a new and clean virtualenv. Create your testing virtualenv and then:
pip install --index-url https://test.pypi.org/simple/ <package_name>
Confirm that installation produced no errors and that you can run your package without any difficulties. In general, confirm that your package works as expected.
Once done, you may upload it to the default PyPI server and then simply use the famous simple command:
pip install <package_name>
Congratulations! If you have made it so far that means you are in position to share your ideas with others and make the world a better place to live!
Extra tip: Recall the keyword argument of the setup function, extras_require,
you may install additional packages/dependencies by just pip install booster[test],
where test is a key of the dictionary.
Sum up
If you're confused with all the above, which I admit, are a lot to learn (but easy ones) in the first place, here are some advices in order to make your life easier:
- Create a virtualenv.
- Try to separate the concerns. First focus on your package and make sure it works. Forget about packaging.
- Write documentation. No, docstrings are not enough! We talked about it above.
- Write tests. No more here to say. We talked about it above.
- Now it's time to think about wrapping your library to a package. Again, separation of concerns.
- Using a cookiecutter of your choice, try to fill/edit/delete each file produced. One at a time.
- Docs work with Sphinx? Tests pass? Package can be installed locally in developer mode? Works as expected?
- Create the archives (wheel and sdist)
- Upload first to testing PyPI and then to the default PyPI
- Enjoy and tell others what you have built.
I am repeating myself here (against the DRY discipline) but it's for good:
Do not rush. One step at a time. Complete each step and then go to the next. Maybe you create your own steps, that's OK. But please try not to do things simultaneously. The error lies in asynchronous human tasks. Be synchronous!
I am not saying that I succeeded the first time I try to build a Python package. I failed. That's why I created this kind of guide. You may fail too. But do not give up. Enough with the advices and lessons learned.
Now dive in and share your ideas with the Python community!
Resources
Python packaging-related videos
If you are a video-person then the following list contains (maybe all) english-spoken
video conferences, since 2012, related to Python packaging.
They are listed from recent to older without making older videos stale
(except those talking about the distutils package).
As a bonus, there is a small comment on each, by me, highlighting some points (if any) about the video.
- What does PEP 517 mean for packaging
- Thomas Kluyver
- PyCon UK 2019 (Cardiff, UK)
- A brief history on Python packaging. Talks about PEP 517, pyproject.toml and
distinguish between frontend and backend of packaging.
- Shipping your first Python package and automating future publishing
- Chris Wilcox
- PyCon 2019 (Cleveland, Ohio)
- Not something new in comparison to other talks in the past.
Ends with the automation of package deployment which is quite handy!
- The Black Magic of Python Wheels
- Elana Hashman
- PyCon 2019 (Cleveland, Ohio)
- Focuses on building extension wheels (ones that include C code, not only Python),
explains what manylinux, auditwheel
and symbol version (C specific) are.
- Dependency hell: a library author's guide
- Yanhui Li & Brian Quinlan
- PyCon 2019 (Cleveland, Ohio)
- Describes the problem of "dependecy hell" (diamond dependency) and recommends on using
semantic versioning (semver)
- Packaging Django apps for distribution on PyPI
- Laura Hampton
- North Bay Python 2018 (Petaluma, California)
- Despite the Django-specific parts at the beginning,
not something new to learn in comparison with the other talks
- Can packaging improve Django deployments?
- Markus Zapke-Gründemann
- DjangoCon Europe 2018 (Heidelberg, Germany)
pip-tools, different Django project structure,contraints.txt,setup.cfg
- How to publish a package on PyPI
- Mark Smith
- PyCon Australia 2018
- gitignore.io, choosealicense.com,
check-manifest, pipenv
- Inside the Cheeseshop: How Python Packaging Works
- Dustin Ingram
- PyCon 2018 (Cleveland, Ohio)
- Focus on packaging history and not on how to package your Python code. Good references, though.
- Packaging Let’s Encrypt Lessons learned shipping Python code to hundreds of thousands of users
- Noah Swartz
- PyCon 2017 (Portland, Oregon)
- Focuses on Python Applications (certbot) and problems encountered during
development and production. Not a talk for Python libraries.
- Share your code! Python Packaging Without Complication
- Dave Forgac
- PyCon 2017 (Portland, Oregon)
- Not something new in comparison to the 2016 talks
- The trends in choosing licenses in Python ecosystem
- Anwesha Das
- PyCon 2017 (Portland, Oregon)
- Learn about different types of licenses and best practices to license your project.
- Python Packaging - current state and overview
- Jakub Wasielak
- EuroPython 2017 (Rimini, Italy)
- Learn a lot about
setup.pylike setuptools_scm,extras_require,setup.cfgpython setup.py install/develop, devpi.net and PEP 440 -- Version Identification and Dependency Specification
- The Packaging Gradient
- Mahmoud Hashemi
- PyBay 2017 (San Francisco, California)
- Focuses more on packaging Python applications instead of Python libraries. Refers to pex,
anaconda, freezers and other methods.
Obsolete, regarding the command for upload to PyPI (uses
setup.py upload)
- Confessions of a Python packaging noo
- Steven Saporta
- PyGotham 2017 (New York City)
- Learn about the different wheel types
- Shipping Software To Users With Python
- Glyph Lefkowitz
- PyCon 2016 (Portland, Oregon)
- Talks more on distributing Python applications and not Python libraries.
Learn about not to install globally using
sudoand instead usepip install --user package
- Publish your code so others can use it in 5 easy steps
- Marko Samastur
- PyCon 2016 (Portland, Oregon)
- It's the same talk as of EuroPython 2016 so, more or less the same.
- Warehouse - the future of PyPI
- Nicole Harris
- PyConFR 2016
- Focuses more on the old PyPI and the birth of the new one (warehouse),
learn about the bus factor, PyPA,
PyPUG, PSF Packaging WG
- Publish your code so others can use it in 4 easy steps
- Marko Samastur
- EuroPython 2016 (Bilbao, Spain)
- It's kind of stale (uses
setup.py sdist uploadinstead of twine)
- What Python can learn from Haskell packaging
- Domen Kožar
- EuroPython 2016 (Bilbao, Spain)
- Talks about Haskell with a few referrals to Python
- Reinventing the
whl: New Developments in Upstream Python Packaging Ecosystem- Nathaniel Smith
- SciPy 2016 (Austin, Texas)
- Speaks about packaging Python applications, mostly, not Python libraries.
Talks about the pip install --pre
and the upcoming pyproject.tomlconfiguration file.
- Rethinking packaging, development and deployment
- Domen Kožar
- PyCon 2015 (Montréal, Canada)
- Talks about the nix project
- Grug make fire! Grug make wheel!
- Russell Keith-Magee
- PyCon Australia 2014
- A little stale but you may learn about
setup.cfg,MANIFESTandLICENCE
- Python packaging simplified, for end users, app developers
- Asheesh Laroia
- PyCon 2014 (Montréal, Canada)
- A bit of stale too, but you learn that
pip install -e .is the alias ofpython setup.py develop
- What is coming in Python packaging
- Noah Kantrowitz
- PyCon 2014 (Montréal, Canada)
- Learn about the warehouse JSON API,
ensurepip,
PEP 453 -- Explicit bootstrapping of pip in Python installations
and
wheels
- Nobody Expects the Python Packaging Authority
- Nick Coghlan
- PyCon Australia 2013
- Talks about the pre-PyPA era and packaging issues that prevent Python packaging from evolving.
Great talk for historical reasons.
- Sharing is Caring: Posting to the Python Package Index
- Luke Sneeringer
- PyConUS 2012 (Santa Clara, California)
- Very good video but a bit of stale since he uses
distutils
Python packaging-related podcasts
If you want to put on your headphones and enjoy the listening about Python packaging, then this list is for you:
- 52: pyproject.toml : the future of Python packaging
- Brett Cannon
- 5 November 2018
Python packaging-related articles
Searching for "python packaging" will give you a ton of results. I tried to minimize this list of results and end up with the following articles. They are in chronological order. This does not mean that older posts are obsolete.
- Python's new package landscape
- Andrew Pinkham
- 11 May 2018
- A tutorial on packaging up your Python code for PyPI
- Brett Cannon
- 28 October 2017
- Sharing your labor of love: PyPI quick and dirty
- Hynek Schlawack
- 29 July 2013 (updated on 23 October 2017)
- Alice in Python projectland
- Vicki Boykis
- 26 September 2017
- Publish your Python packages easily using flit
- Bruno Rocha
- 22 August 2017
- Conda: Myths and misconceptions
- Jake VanderPlas
- 25 Aug 2016
- Python packaging is good now
- Glyph Lefkowitz
- 14 August 2016
- Testing & Packaging
- Hynek Schlawack
- 19 October 2015
- Python packaging pitfalls
- Ionel Cristian Mărieș
- 25 June 2014
- The package dependency blues
- Miguel Grinberg
- 2 Sep 2013
- setup.py vs requirements.txt
- Donald Stuff
- 22 Jul 2013
- Incremental plans to improve Python packaging
- 6 things I learned about setuptools
- PyPA tutorials
- PyPA guides
- setuptools official docs